Fields Administration
Insight offers approximately 250 fields, which can be used in your site. Click the Admin button, and at Site Configuration select Fields.
Insight Field Categories
Fields are categorized by their type and include:
Control Fields: These fields are used as an identifier to group, link or track your documents.
Doc Status: Fields used to track information about a document. Other fields can be added or edited, but again, do this before documents are loaded to the site if at all possible.
eDoc: Fields that contain data about electronic documents.
Email: Fields containing data associated with emails.
Name: Fields containing names identified in electronic documents or emails.
Production: Fields used specifically for production of documents.
Review Fields: Review fields are typically user editable fields that are made available in document forms.
Spare: Fields available for use for a specific purposes relating to the case.
System: System fields are used by the application and are not editable.
Upload: Populated by and/or only used by the upload process or fields populated at upload time.
Virtual: Used for specific purposes within the application.
List of Fields
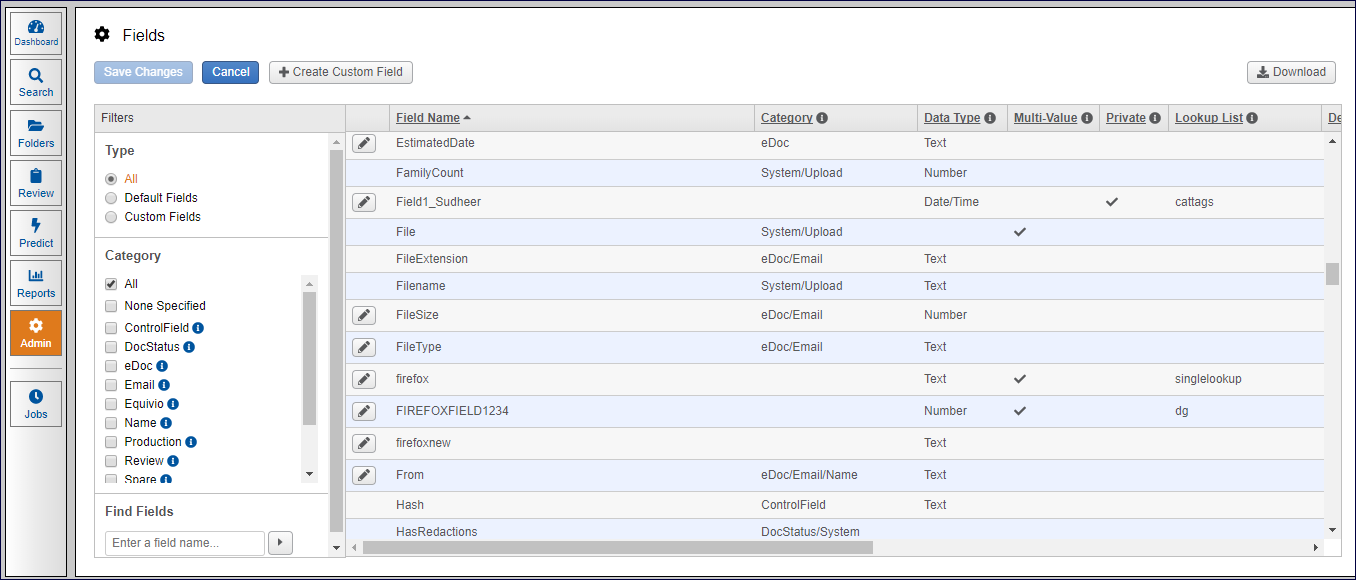
Filters at the left provide a quick way to find an existing field and include:
All: Displays all fields associated with your site; selected by default.
Default Fields: Displays only the fields created automatically for your site.
Custom Fields: Narrows the page content to those fields that were customized for the site.
Category: Displays fields by category. If, for example, you wanted to see all fields categorized as email fields, select the Email checkbox, and the list will automatically refresh to limit the list to only those fields.
Find Fields: Allows you to search for fields containing the text entered.
Editing Fields
If you need to add or change fields, click the Edit Fields button at the top of the page. This button may temporarily be disabled if other processes involving fields are being carried out on the site. Fields that are editable have an Edit (pencil) button. Clicking it allows you to change certain properties. A single-value field can be changed to a multi-value field, but a multi-value field cannot be changed to a single-value field.

Create a New Field or Edit an Existing Field
Insight standard fields meet the needs of most sites, and it is best practice to add or edit fields at the beginning of the site, not after documents are uploaded. Fields are part of the XML record, and any documents already uploaded to the site will not contain the new fields. Adding fields after documents are loaded requires re-indexing. Depending on the number of documents on the site, this can be time consuming and delay review.
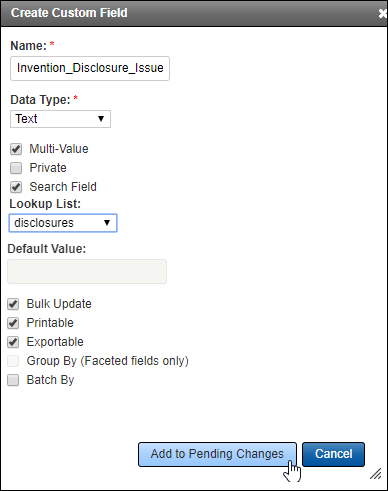
Click Edit Fields button and then the Create Custom Field button. (Remember to edit an existing field, click the Edit (pencil) button beside the field; the Add and Edit dialog boxes are identical; however options may not be available.)
In the Create Custom Field page, enter a name for your field (the system will inform you if the name doesn’t match the system requirements).
At Data Type, expand the menu and select the database type. Choose Date/Time to create a field that will be populated with date and time information. Date fields will only contain date information. Most fields are Text fields, which mean they do not have to meet specific criteria. If the field will contain numbers that are not dates, select Number. Once a custom field has been saved in the database, the Data Type menu is no longer enabled. You cannot change the type of data for a field once it is stored.

The next field properties you can set include:
Multi-Value: Select this checkbox to allow the field to contain more than one value. Multi-value fields typically have Lookup tables associated with them. If a field is added as a multi-value field, this checkbox will no longer be enabled. You cannot take a field from multi- to single-value. You can change a field to multi-value if it were added as a single-value field.
Private: Select this checkbox to ensure the field can only be assigned to one Security Group. This checkbox is disabled after the field is saved. This ensures a field designated as Private cannot be changed and potentially available for users who should not see it.
Search Fields: Select this checkbox to make the field available in Search Fields administration. The field can then be made available in the Field Name menu of Search Assist.
Lookup List: If you need to associate a lookup table to your field, expand the Lookup List menu, and select the lookup table. A table can only be associated to one field. Lookups in use are not available for selection in the menu.
Default Value: If the field needs to be populated with a default value, enter this at the Default Value text box. This only affects futures document uploads. If documents are already on the site, the field will not be automatically updated with the value.
Bulk Updatable: Select this checkbox to make the field available for updating in the Bulk Update Wizard.
Printable: Select this checkbox to make the field available for selecting in the Batch Print Wizard.
Exportable: Select this checkbox to make the field available to use in the Export Wizard.
Group By: This checkbox is not enabled for custom fields. Fields with this property can be used to group documents.
Batch By: Select this checkbox to make the field available for updating with batch numbers in the Batch Wizard.
Click the Add to Pending Changes button.
The Save Changes button at the top of the page is enabled now. Click it to instruct the system to carry out all the field changes you have made. Any edits you made in the field dialog boxes will not be captured if you do not click Save Changes.