Production Specifications Wizard
Creating a New Production Specification
In the Production Specification wizard, you’ll be able to configure the following production specifications:
Step One
General Information
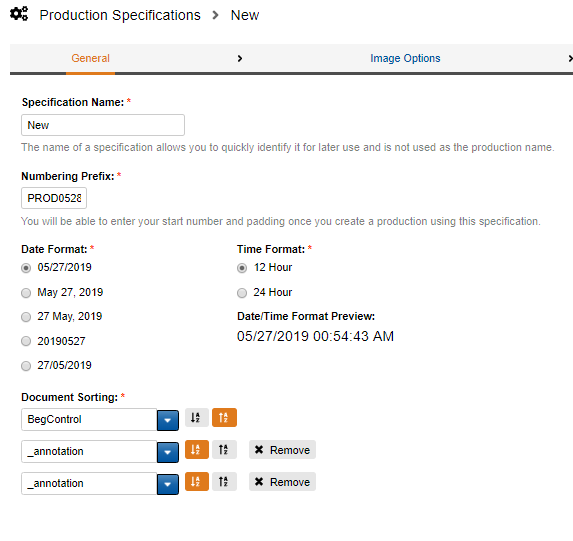
In the first section of the Production Specifications wizard, fill out the fields in the General section as required.
In the Specification Name field, you are required to name your production specification; however, this name will not appear on your production documents.
At the Numbering Prefix field, Input your desired Prefix.
Example Bates Number:
DOJ0000000001
where 'DOJ' is the prefix.
Note
● The character maximum for the production number (Bates Number) is 20.
● The Prefix character limit is 1 to 15 alphanumeric or unicode characters. No special characters are allowed.
● The maximum number of characters you can enter at Starting Number is 10, and they must be numeric characters.
At the Document Sorting options, select a field you would like to use to sort your production. To do this, expand the dropdown menu, and then select the desired field. Click +Add Sort to include additional sorting fields. The default field for Document Sorting is the BegControl. You can add up to three fields in your sorting instructions.
Once you're satisfied with your General configuration selections, click Save> to set up your production specification Image Options.
Step Two
In the Image Options section, you must select whether you want to provide images as PDFs or TIFFs in your production.
Select the button beside the appropriate type of file format you want to use for your production's images.
Your options are as follows:
PDF:
For PDF productions, select the radio button beside the desired Image Option below:
● Color, multi-page, searchable
Or
● Black and white, non-searchable Image Only PDF
TIFF:
● Single-Page, black and white with ability to add a rule to Produce certain documents in color.
Note: Color cannot be automatically detected when producing images as a TIFF.
● Multi-Page, black and white, non-searchable
Image Endorsement / Watermark Configuration
You will notice the Image Endorsement / Watermark Configuration options immediately to the right of the Image Options pictured below:
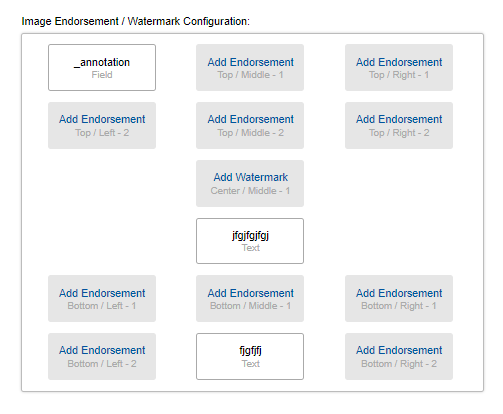
Simply click the box where you would like your Endorsement / Watermark to appear on your production documents.
● See Watermark Configuration for more steps on setting up watermarks.
Once you're satisfied with your Image Options settings, click Save> to continue to setting up the Native File options.
Step Three
Next, you will configure the Native Options, which will allow you to indicate if you want to produce files in their native file format by selecting the buttons beside each of the following options:
● Don't produce natives (select this option if you do not want to produce native file types).
● Produce Natives for all (produces all files in their native file type).
Note: If you choose the Native Only option, the files will be renamed according to your control number specifications.
● Produce Natives for certain docs: Choose this option if you know the native file types you need produce.
Note:
If you choose to produce native file types for certain files, and if there are native file types that contain redactions, they will be produced as an image in the images output folder according to the Image Options.
If your production has spreadsheets, we recommend you select to provide them as the native file with a placeholder for the images. This is preferred since converting spreadsheets sometimes distorts the information compared to looking at the file natively.
● Printable Formats:
● Presentations: .odp, .pot, .potm, .potx, .ppa, .ppam, .pps, .ppsm, .ppsx, .ppt, .pptm, .pptx, .thmx
● Spreadsheets: .ocsv, .dbf, .dif, .ods, .prn, .slk, .xla, .xlam, .xls, .xlsb, .xlsm, .xlsx, .xlt, .xltm, xltx, .xlw
● Word processing files: .doc, .docm, .docx, .dot, .dotm, .dotx, .odt, .rtf
● Custom (allows you to enter a .csv list of extensions you want to produce in their native file format).
● Non-Printable Formats:
● Audio files: .aif, .cda, .mid, .midi, .mp3, .mpa, .ogg, .wav, .wma, .wpl
● CAD files: .step, .iges, .parasolid, .stl, .vrml, .x3d, .collada, .dxf
● Video files: .3g2, .3gp, .avi, .flv, .h264, .m4v, .mkv, .mov, .mp4, .mpg, .mpeg, .rm, .swf, .vob, .wmv
Use Other to enter any other file types by extension, such as .gpg.
Select the checkbox beside the option that corresponds to the way that you want your natives produced. After selecting a checkbox, you can indicate how these types of files should be produced: Native +Images or Native + 1st 5 Pages or Native + Placeholder.
Note: If you select Native + Placeholder, the Choose Placeholder menu appears, and you can either select from the placeholders on your site, or you can click the Manage Placeholder button.
Once you're satisfied with your Native file handling configuration for your production, click Save> to continue.
Step Four
Next, you will need to configure your Production Specification's Placeholder rules.
Placeholders can be inserted to replace documents in the production. They are often used to take the place of files that are produced in their native file format because native files are not redacted and may contain privileged information so Placeholders must be configured.
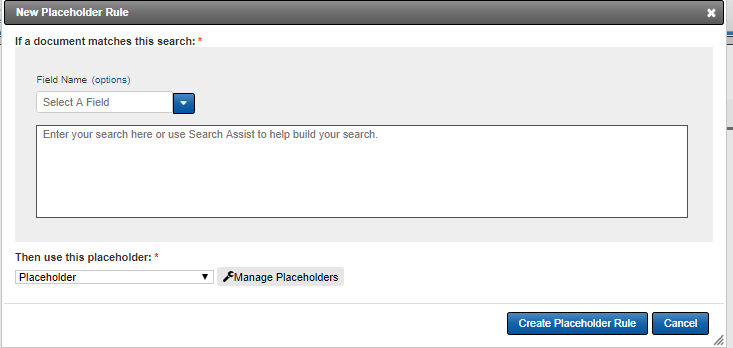
To add a placeholder rule, click +New Placeholder Rule. The New Placeholder Rule window will open.
Click the dropdown menu under Field Name, and select a field. You can either enter the search manually or use the Search Assist to help build your search. Then, select Manage Placeholders if you do not have any placeholders configured. Once you have configured your Placeholder settings, click the Create Placeholder Rule button.
In addition, selecting the Automatically replace conversion error files with placeholder button means that the system will replace all documents that encounter conversion errors with a placeholder. When this option is selected, you can select the dropdown menu beside the Placeholder selection menu or you can configure a new Placeholder if you click the Manage Placeholders button. Note that this rule will be run after the Placeholder rules.

Note:
● Rules are executed in the following order:
Rule-based placeholders,
Native
Then conversion placeholders.
● Once a rule executes, no further rules are applied.
Step Five
The Load File Step of the Production Specification wizard allows users to select the fields to include and customize in the load file. See the Load File Specifications page for more information about configuring the Load File.
Step Six
Allows you to specify your delivery requirements. You may select to use the Catalyst FTP server, another server, and you may also specify delivery via overnight courier for Physical Productions.
Step Seven
Review Specification
The last step in the Production Specification creation wizard provides a summary of all the options you have selected that will be used for the production. If you see something that doesn't look right, simply click <Save or click the corresponding links across the top to quickly navigate to the section of the specification you want to change. Be sure to carefully review your Production Specification options, and then click the Confirm + Exit button to complete the Production Specification creation process.

