Create and Manage Stages
Stages are used to implement your workflow design, and rules determine the flow of documents. A document does not need to go to each stage. It can remain in a stage after it is reviewed and released or move to other stages, based upon the defined rules.
To add reviewers to stages and to route documents from one stage to another, the stages must first exist. For example, if you have created an Initial Review stage and want the documents coded for Privileged to go to a Privileged stage and remaining documents to move by default to a different stage, those stages must first be created.
To create stages for your project:
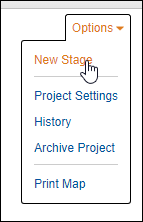
Expand Options and click New Stage.

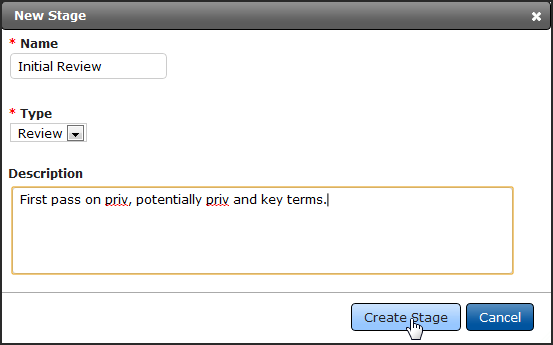
In the New Stage dialog box, enter a name for the stage in the Name box.
At Type, select Review for a typical review stage. Select QC If the stage will be used for quality control purposes.
If you would like to enter more information or notes, use the Description box. This information will be available when you or other review administrators point to the stage.

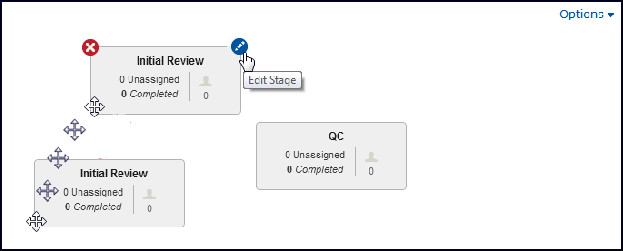
Click the Create Stage button. The stage appears in the Dashboard. You can continue to add stages in the same way.
To move a stage on the screen, point to the stage. The pointer becomes a four-sided arrow, you can move the stage in the screen.

Point to the stage, and then click the Edit (pencil) button to add users, rules and establish properties for your stage. You can remove a stage using the Delete (x) button. If you try to delete a stage which has documents, you will be prompted to move the documents before you can delete the stage.
Add Users
Users must be added to the appropriate stages in order to access documents.
To add or remove users in a stage:
Point to the stage and click the Edit (pencil) button.
In the Users tab, click the Add User button.
You can display a list of available users based on all users in the site or by role. Move a user or users from the Available Users list to the Selected Users.
Clicking the Add Users button returns you to the Users tab.
Remove a user from the stage by clicking the Delete (x) button; however, this button will not be enabled if the user has documents. You will need to reassign the documents to another user before you can remove the user from the stage.
Self-Assignment Options
To set parameters for the way in which documents are accessed, click the Edit button of the stage and then click the Self-Assignment Options tab.
Maximum Documents
At Maximum Documents select the number of documents a reviewer can have in the stage. This number includes all the documents regardless of whether they have been updated.
Document Grouping and Prioritization Options
Select the Standard option unless the stage you are setting up is part of a Predict project.
Group By
Use the Group By menu to select the field upon which to group the documents. Grouping documents means you are keeping documents together based upon a similar field value, such as custodian or language or email threading.
Sort By
You may sort the results by up to three fields in ascending or descending order at Order By.
Review By Email Conversations/Threads
When setting up a review by email conversations and threads (i.e. keeping conversations together), select ThreadGroup at Group By and ThreadSort at Order By. For more on threading and the fields required, see the Email Conversations and Threading topic.
Filter By
At Filter by, you can set filters to ensure that certain documents are assigned before other documents in the stage. Setting up filters works like setting up search queries. Type directly in the box, or use the Search Assist to create your filter or filters.
Remember to monitor the stage if you’ve set filters. Once all documents that meet the filters are assigned, other documents cannot be accessed by reviewers until the filters are removed.